It’s now time to commence assembly of our structure!
These instructions are meant to compliment those that come with the kit by providing additional details, tricks and things to watch out for. This also is a recommended build/assembly sequence.
Before you commence assembling the kit, first:
- Read the Instructions. Do your best to understand what the build sequence is and familiarize yourself with the kit pieces. I know this is contrary to the male instinct, but it will pay off in the long run!
- Assemble your tool kit.
- Assemble your paints. More on this topic below.
Floor Assembly
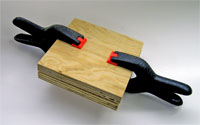
The Bakery floor is made up of two large boards that are sandwiched together. Both panels have a 45 degree corner taken off (this is for the front door entrance). The upper panel has a floor board pattern “etched” in by the laser. You need to glue these two panels together with the floor boards visible on the upper piece. Apply the top panel on this and clamp the two pieces together and set aside to glue overnight. It is important to keep both pieces in perfect alignment (the layer of glue does create a slippery surface). I clamped my piece between two pieces of plywood to ensure it stayed flat (see picture). Placing some weights on top, like a set of books, will also work well.
When the glued has dried, sand the edges flat.
You may also want to add some extra details to the floor surface by scribing (with your hobby knife) some board ends and even add some nail holes (with the sewing pins).
You may also choose to “stain’ the floor boards at this time though this can be done later as well. Use a light coloured stain that would reflect the colour of a wood floor. I used an old jar of Floquil cherry stain that I had kicking around.
You may have to apply some weights to the panel while the stain dries just to ensure it doesn’t warp. If it does, just stain the back side and add the weights, this should remove any warpage.
Paints
There as as many philosophies about how to paint models as there are clouds in the sky. Each are great in their own right and neither is any better than the other – it’s all about personal preference. For the purposes of this project, we will be exploring the use of water based craft paints that you can find at your local craft store. These are very inexpensive and are available in a wide range of colours.
When you select your colours, try to visualize where the model will be placed on your layout, the adjoining structures and most importantly, the era of the scene. I model in the the 1930’s so building colour schemes were rather subdued and the colour selection wasn’t great. So I’ve chosen a light grey for the main field of the walls and a darker grey for the trim. As my building will be showing years of use/abuse, we will blend these two colours even more when we do our weathering.

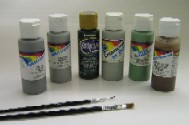
Here are examples of the water-based craft paints. You can find these at Micheals Craft store as well as other “crafty” places. They are typically about $1.25 a bottle and will last you a long time.

