Assembling The Structure
By Grant Knowles
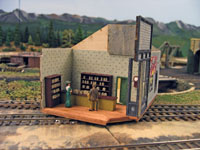
With all the wall preparation work completed, we can launch into assembling the walls together into a structure. We’ll assemble the back half of the building first then make our way around to the store front.
Step 20
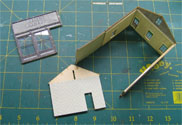
Glue Right hand wall to Rear Wall. Ensure the walls are at right angles to each other. If possible, use clamps to hold the joint tight while the glue dries.
 Use a “square” to ensure the walls a glued at a right angle.
Use lots of clamps to hold the seam together while the glue dries.
Step 21
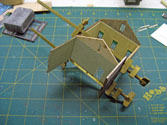
Repeat the previous step to glue the Left-hand wall to the Rear Wall assembly. Once again, make sure the joint is tight while the glue dries.
Step 22
Glue the dividing wall in place. The top edge of the Dividing Wall fits into the two small key slots on the top of each side wall. Glue the Dividing Wall in place ensuring it is vertical to the side wall. Once again, use of clamps is recommended until the glue has dried.
Step 23
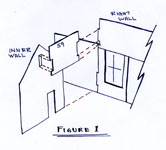
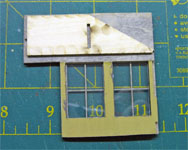
Locate the raised Rear Roof Wall panel S9. This piece will be glued against the Dividing Wall (Step 22) while interlocking with the Right Side wall. See Figure 1. The orientation of this panel is important. The scribed side of the Roof Panel goes against the Dividing Wall, there is a notch in the Roof Wall that is to line up with the rectangular cut out in the Dividing Wall and the tabs at the other end are to interlock with the holes/notches in the Right Hand Wall. Test fit the piece first. When satisfied all fits perfectly, remove, apply glue to the mating surfaces and clamp in place.
Step 24
At this point of assembly, I found the walls in my building assembly kept warping on me if I didn’t leave them under weights. So I chose to glue this assembly to the base at this time. Now this is the process I followed, you may do likewise or choose your own approach, whatever you feel comfortable with.
- Locate the Base Assembly (from Step 1). The front end has the floor boards marked as well as the front right corner is on a diagonal. Notice that there is a line that goes around the perimeter of the other three edges – this marks where the walls will be mounted on top of the base. Apply a small bead of glue to the bottom edge of the rear and right walls.
- Place the wall assembly on top of the floor and clamp it in place overnight after you have made sure all the edges line up evenly. The walls should be on top of the floor panel – not overhang it.
- To glue the Left Wall, carefully insert your hobby knife between the Left Wall and the Floor panel, you can open up a gap big enough to feed some glue in with a tooth pick. Apply glue along the whole length as well as under the central Dividing Wall (as much as you can). Now clamp these pieces to the base overnight ensuring they are all in alignment.
- You can also dry fit the Front Wall in place while the glue dries to ensure the Left and Right Walls are spaced the right distance apart.
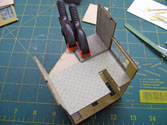
 Clamps are used to hold the Right & Rear Walls to the Base while the glue dries. The same approach is followed to glue the Left and Dividing walls to the base next.
Step 25
Next on the list is to glue the Front Roof Support to the rear of the Front Wall. Unfortunately there are no markings to help locate this piece so refer to Figure 2 for guidance. Locate Front Roof Support S11. This piece is to be attached to the rear of the Front Wall. Locate this about 3 scale inches below the top edge of the Front Wall and all the way to the left (looking at the rear of the Front Wall) lining up with the insert notch. The right edge of the Front Roof Support should line up with the height of the Left Wall. You may want to dry fit the Front Wall in place to confirm this height. Glue the Front Roof Support in place when you are satisfied with it’s location. Clamp overnight.
Step 26
If you plan on addig a detailed store-front interior, you may want to spend a little time now and install most of it before the front wall goes on in the next step.
Step 27
The next step will involve gluing two pieces in place simultaneously: the Front Wall and the connecting Roof Panel S8.
- Hold the Front Wall panel in place with a couple of rubber bands. Locate the Roof Panel S8 and test fit it in place. The long tab end goes into the slot on the Dividing Wall while the shorter tab fits into the slot in the Front Roof Support (Step 25). You may have to remove the Front Wall to test fit the piece in place. I found my S8 piece to be slightly too long so I trimmed it to fit.
- When you are satisfied the Roof Panel and Front Wall all fit together correctly with the rest of the building assembly, you are ready to glue.
- Apply some glue to the long tab end of the Roof Panel and insert this into the Dividing wall.
- Apply glue to all the mating surfaces on the Front Wall including the other tab on the Roof Panel.
- Now place the Front Wall in place, re-install the rubber bands and clamp where required to hold the pieces together. Double check to ensure everything is in alignment and leave overnight for the glue to set.
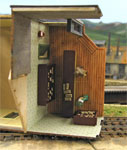
 I also added a stip of wood on the back side of S8 to help hold it straight. The Entrance Way Ceiling (in place in this photo) will be installed after the front doorway has been glued in place.
